WELCOME TO BHATI TRICKS WRITE FOR US ADVERTISE YOUR BLOG/SITE HERE POST YOUR ARTICLE/TRICK HERE


Showing posts with label REGISTRY. Show all posts

Wednesday, 7 August 2013

DISPLAY NOTICE ON STARTUP IN WINDOWS

0 comments
DISPLAY-NOTICE-ON-START-UP-IN-WINDOWS
IN THAT ARTICLE YOU WILL FOUND THAT HOW TO DISPLAY A NOTICE ON START-UP  ON THE DEMAND OF A READER OF OUR SITE.If your PC has multiple users then you can now display legal notice to every user before they login to your PC. This legal notice will be displayed at every startup just before the Desktop is loaded. Using this you can tell your friends about the do’s and dont’s in your computer when they login in your absence. Well you can do this pretty easily. For this there is one small registry hack. Here is the step-by-step instruction to do this. 

STEP 1. Go to Start->Run, type regedit and hit ENTER

STEP 2. Navigate to the following key in the registry
HKEY_LOCAL_MACHINE\SOFTWARE\Microsoft\Windows\CurrentVersion
\policies\system
On the right side pane look for “legalnoticecaption“, double click on it and enter the desired Legal Notice Caption.

STEP 3. Next below this look for “legalnoticetext” and enter the desired Legal Notice Text. The legal notice text can be up to a page in it’s size so that it can include a set of do’s and dont’s for your computer.

STEP 4. After you do this just restart your computer and upon the next startup you can see the legal notice information for your computer. This trick works on both XP and Vista. You can also try it on Windows 7 and should work with no problems.
PLEASE FEEL FREE TO POST COMMENTS BELOW THE POST.

Saturday, 27 July 2013

PREVENT USB DRIVES FROM VIRUS ENTITY - A SIMPLE AND WORKING REGISTRY TRICK

0 comments
PROTECT-USB-FROM-VIRUS-VIA-REGISTRY-EDIT

IN this tutorial, you will find that how can you prevent the virus entity in your usb drives. This trick is very useful if you have virus in your,computer and want to copy files from a USB Drive but don’t want to transfer virus to the USB.
TO MAKE IT POSSIBLE, FOLLOW THE STEPS:-
STEP1: Open run box (by pressing win+R)
STEP2: Type REGEDIT in text box.
STEP3: Now navigate to : HKEY_LOCAL_MACHINE>SYSTEM>CurrentControlSet>Control
STEP4:  Here in right side panel, RIGHT CLICKt to create a key with,the name “StorageDevicePolicies”.
STEP5: Again right click to create new DWORD value then label it “WriteProtect”. Set its value to “1″.  Now in left side panel, select “StorageDevicePolicies” key,
STEP6: For again to enable it, set its values to “0″.
STEP7: Now close the registry editor and restart your computer,after any changes to go into effect.
NOTE: BECAME A FOLLOWER OF OUR SITE TO GET MORE LATEST UPDATES.

Friday, 19 July 2013

DISABLE USB PORTS WITHOUT ANY SOFTWARE

0 comments


DISABLE-USB-PORTS-WITHOUT-ANY-SOFTWARE

Pen drives are major cause of virus,  malwares and other suspicious threats in your system. it is possible to disable USB ports of your system, which prevent unwanted user (friends and others) to transfer data from your system.
In this article I will tell you that how to disable USB port by simple registry edit. So now let’s start.

Note:- Before going ahead take a back up of your registry.
Please follow the steps:-
Step 1:- open run and type “regedit".
DISABLE-USB-PORTS-WITHOUT-ANY-SOFTWARE
Step 2:- Navigate to the
[HKEY_LOCAL_MACHINE\SYSTEM\CurrentControlSet\Services\USBSTOR]
DISABLE-USB-PORTS-WITHOUT-ANY-SOFTWARE
Step 3:- Now create a dword file by right click on USBSTOR
DISABLE-USB-PORTS-WITHOUT-ANY-SOFTWARE
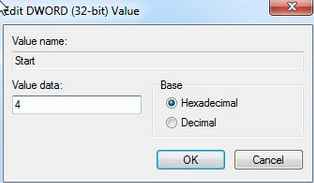
Step 4:- Rename it as "start" (dont create it if it is already exist).
Step 5:- Now open it,and set the value "4" in the value data box.
DISABLE-USB-PORTS-WITHOUT-ANY-SOFTWARE
Step 6:- Now refresh the registry by pressing F5. And restart your system, and see the effect.
NOTE:- FOR ENABLING CHANGE THE VALUE DATA TO THE 3.THEN RESTART YOUR COMPUTER,AND SYSTEM WILL SHOW USB DRIVES AGAIN.
PLEASE IF YOU GOT STUCK AT ANY POINT, PLEASE LEAVE A COMMENT FOR US. AND DON'T FORGET TO SUBSCRIBE US.

HIDE YOUR PERSONAL DATA BEHIND A IMAGE

0 comments
HIDE YOUR PERSONAL DATA BEHIND A IMAGE
IN THAT POST I WILL TELL YOU THAT HOW CAN YOU HIDE YOUR DATA FROM OTHERS IN YOUR COMPUTER. Really it is a fantastic trick. In your computer, there are many important files or documents you want to hide from your friends and others. In this trick you will found that how can you hide your personal data behind the images. When anyone open it, then he will see only image.
So now lets start, to hide your data behind a image, please follow the steps:-
STEP1:- firstly download WINRAR from here :-WINRAR, and install it.
STEP2: copy a particular image(say 1.jpg) to be used for hiding data behind it. on desktop
HIDE-YOUR-PERSONAL-DATA-BEHIND-A-IMAGE

STEP3:-now select your personal file(say 2.txt) to hide behind that image.
HIDE-YOUR-PERSONAL-DATA-BEHIND-A-IMAGE 
Archive it with WINRAR, by right click on it.(make it in .rar format).And paste it on desktop(say 2.rar).

HIDE-YOUR-PERSONAL-DATA-BEHIND-A-IMAGE
STEP4:-now open the command line by typing cmd in run box. Or (start>accessories>command prompt).
HIDE-YOUR-PERSONAL-DATA-BEHIND-A-IMAGE

STEP5:-type the following command in command line:-
cd desktop

HIDE-YOUR-PERSONAL-DATA-BEHIND-A-IMAGE

NOTE: CD is used for change the directory.
STEP6:- now type the highlighted command in command line(note: put spaces at right places):-
Copy /b imagename.jpg + filename.rar finalimage.jpg

IN THE ABOVE COMMAND CHANGE:-
imagename.jpg by image name you want to hide the document behind the image.
Filename.rar by your personal document name(say 2.rar).
Finalimage.jpg by your final image. This is the image(SAY 3.jpg) where your document will be hidden.
EXAMPLE:-
Copy /b 1.jpg + 2.rar 3.jpg

AND PRESS ENTER. NOW A NEW FILE WILL BE GENERATED ON DESKTOP.(SAY 3.JPG)
HIDE-YOUR-PERSONAL-DATA-BEHIND-A-IMAGE
NOTE:THE TASK IS TOTALLY COMPLETED.NOW WHEN YOU OPEN THE FINAL IMAGE(3.jpg) IT WILL OPEN AS NORMAL IMAGE.
FOR OPEN YOUR HIDDEN FILES BEHIND THAT IMAGE, FOLLOW THE STEPS:-
STEP1:-open WINRAR, and click on file>open.
HIDE-YOUR-PERSONAL-DATA-BEHIND-A-IMAGE

STEP2:-here open your final image (say 3.jpg).OR YOU CAN DRAG IT DIRECTLY TO THE WINRAR. And it will display your personal document.
HIDE-YOUR-PERSONAL-DATA-BEHIND-A-IMAGE

NOW YOU CAN HIDE YOUR PERSONAL DATA LIKE VIDEOS, TEXT FILES BEHIND ANY IMAGE BY THAT SIMPLE TWEAK.
IF YOU HAVE ANY PROBLEM REGARDING THAT POST, PLEASE LEAVE A COMMENT FOR US. AND PLEASE DONT FORGET TO SHARE THAT POST WITH YOUR FRIENDS.


Thursday, 27 June 2013

DISABLE KEYBOARD IN WINDOWS XP/VISTA/7/8

0 comments


DISABLE-KEYBOARD-IN-WINDOWS XP-VISTA-7-8

DISABLE KEYBOARD IN WINDOWS XP/VISTA/7/8
In this tutorial you will learn that how to disable keyboard in windows xp/vista/7/8 by a simple registry edit. It is applicable to all windows system.
it is also a good prank for you friends.
Note: before going ahead please take a back up of your registry
To increase the speed of menu display speed, follow the steps:-
step 1:- go to start>run.
Step 2:- in the text box tyoe “regedit”. A registry editor window will opened.
DISABLE-KEYBOARD-IN-WINDOWS XP-VISTA-7-8

Step 3:-then navigate to :-
HKEY_CURRENT_USER>Control Panel>Accessibility>Keyboard Response>
DISABLE-KEYBOARD-IN-WINDOWS XP-VISTA-7-8

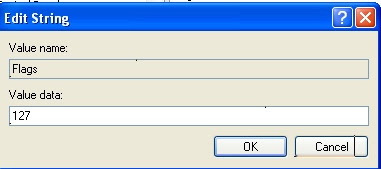
Step 4:-now, create a new string value (by right click on response).(if “flag” file is already exist then don’t create it)
Step 5:- rename it “Flags”, and set it’s value to the 127.
DISABLE-KEYBOARD-IN-WINDOWS XP-VISTA-7-8

Step 6:-again navigate to to :-
HKEY_CURRENT_USER>Controlpanel>Accessibility>SoundSentry
DISABLE-KEYBOARD-IN-WINDOWS XP-VISTA-7-8

Step 7:-here, create a new string, and rename it “Flags”. (if “flag” file is already exist then don’t create it). and set it’s value to the 3.
DISABLE-KEYBOARD-IN-WINDOWS XP-VISTA-7-8

Step 8:- refresh registry editor by pressing F5, then close it.
Now restrart your computer, and see the effects
After restarting of computer, any key on keyboard will not work, you have to use windows on-screen keyboard.


Note:-for disable this effect delete “Flags” string, and restart your computer
AND DON'T FORGET TO SUBSCRIBE US FOR LATEST UPDATES. 

BOOST YOUR START MENU DISPLAY SPEED

0 comments
BOOST-YOUR-START-MENU-DISPLAY-SPEED

INCREASE START MENU DISPLAY SPEED
In this tutorial you will learn that how to increase start menu display speed.
Many times, when we click on start menu then there is some delay to display the programs,but it has no reason. That speed can be maintained by a simple registery edit.
Note: before going ahead please take a back up of your registry
To increase the speed of menu display speed, follow the steps:-
Step 1:- go to start>run.
Step 2:- in the box, type “regedit”. A new window will opened.
BOOST-YOUR-START-MENU-DISPLAY-SPEED

Step 3:-then navigate to:-
HKEY_CURRENT_USER\Control Panel\Desktop
BOOST-YOUR-START-MENU-DISPLAY-SPEED

Step 4:- in the right pane find “Menu show delay”.
BOOST-YOUR-START-MENU-DISPLAY-SPEED

Step 5:- open it, and set the default value to the “000”
BOOST-YOUR-START-MENU-DISPLAY-SPEED
IF YOU HAVE ANY PROBLEM, THEN PLEASE CLICK ON THAT VIDEO.


NOTE:- IF YOU GOT LOST AT ANY POINT, PLEASE LEAVE A COMMENT FOR US. AND DON'T FORGET TO SUBSCRIBE US.


Sunday, 16 June 2013

COMMAND PROMPT ON RIGHT-CLICK

0 comments
COMMAND-PROMPT-ON-RIGHT-CLICK
Sometimes it is necessary to launch command prompt window while the execution of PROGRAMS.And the main problem is that,when command prompt is open,the default path is the system path.Then user will have to do type “cd/” command to change the working directories.In this tutorial you will learn that how to add an option called “command prompt” on right click on a folder.It is just a simple Registry editing.When user click on this option ,then command prompt will launched with the path of selected folder To get the “command prompt” on right click,follow these steps:-
Step-1:Go to Start ,then click on Run,In the box,type "regedit" and press enter
COMMAND-PROMPT-ON-RIGHT-CLICK
Step-2: Go to the "HKEY_LOCAL_MACHINE\SOFTWARE\Classes\Folder\shell"
COMMAND-PROMPT-ON-RIGHT-CLICK
Step-3:Right click on "shell" and select and select new key Note:-Be sure that a new key is created under "shell". Now rename it to "Command Prompt"
COMMAND-PROMPT-ON-RIGHT-CLICK
Step-4:Right-click on "Command Prompt" and then select New Key
Step-5:Rename it to the "command"
COMMAND-PROMPT-ON-RIGHT-CLICK
Note: It is case sensitive
Step-6:Double-click on the "Default" on the right side of window
Step-7: Type the highlighted string in the text box
cmd.exe "%1"
COMMAND-PROMPT-ON-RIGHT-CLICK
Step-8:Click ok and refresh the registery by pressing F5,and enjoy
Note:-for better performance restart your system.


If you got stuck at any point,please leave a comment for us.
 

ABOUT THE AUTHOR

Founder & Author:I ABHISHEK BHATI student of COMPUTER SCIENCE by education a Blogger by profession. Exploring Technology is my passion.BHATI TRICKS is place for Tech Lovers. ABHISHEK BHATI launched his frist Marketing Site in 2013.
...Read More

GET FREE EMAIL UPDATES

Join us for free and get valuable content delivered right in your inbox.


recent comments

BHATI TRICKS Widget

| BHATI TRICKS © BHATI TRICKS. All Rights Reserved | | Back To Top |