WELCOME TO BHATI TRICKS WRITE FOR US ADVERTISE YOUR BLOG/SITE HERE POST YOUR ARTICLE/TRICK HERE


Showing posts with label TRICKS. Show all posts

Wednesday, 28 August 2013

REMOVE BIOS PASSWORD -BY SIMPLE TRICK

0 comments
RESET-BIOS-PASSWORD

REMOVE BIOS PASSWORD -A KILLER TRICK
IN that article I will tell you that how can you crack the bios password. As you already know that BIOS stands for "Basic Input Output System". BIOS is a system that is pre programmed, you have not permissions to change it. By BIOS controls you can customize your machinery. Features like fan temperature controller, fan speed can be controlled by BIOS unit. That's why, technical users keeps password on BIOS system. you can change priority of booting device by BIOS system. If you are forgetting your BIOS password, don't worry, by a simple trick you can reset it. It requires a little bit of knowledge of opening the cabinet box and mother board.

you may also like:-

METHOD 1:
For reset the password of BIOS please follow the steps carefully:-
Step 1:- Open the cabinet box (CPU), observe the mother board.
Step 2:- Then you will find a battery like coin, (it is BIOS battery which regulates the system clock for 24x7 hours, and regulates the booting process on start up.)


RESET-BIOS-PASSWORD

Step 3:-Remove the battery from it's slot, and wait for 45 seconds and place the battery back to the slot in mother board.
Step 4:- And restart your computer, and set the clock from BIOS features.
And the task is totally completed. you will see that the password from BIOS is removed.


METHOD 2:-
In that tricks you can reset the BIOS password from command prompt. By typing a set of commands you can remove the BIOS password.
NOTE:- But that tricks is not applicable for some BIOS versions.
Step 1:- Open command prompt ( Start> Accessories> command prompt )
Step 2:- Type the following command one by one:-
DEBUG
 -o 70 2e
 -o 71 ff
 -q
 exit
Step 3:- Now restart your computer, and you will see that password is removed from BIOS unit.
NOTE:- This trick is only for knowledge purpose.
please post your feedback about that post in comment box and join us at Facebook BHATI TRICKS, And subscribe us for latest updates via e-mail.

Wednesday, 7 August 2013

TEST YOUR ANTIVIRUS BY A SIMPLE TRICK

0 comments
TEST-YOUR-ANTIVIRUS

HI! friends, In this article, Today i am sharing a outstanding trick to test your anti-virus.
Have you ever wondered how to test your Antivirus software to ensure it’s proper working? Well here is a quick and easy way to test your antivirus. The process is called EICAR test which will work on any antivirus and was developed by European Institute of Computer Antivirus Research. This process can be used by people, companies and antivirus programmers to test the proper functioning of the antivirus/antimalware software without having to deal with the real computer virus which can cause damage to the computer. Here is a step-by-step procedure to test your antivirus.


 STEP 1. Open a notepad (New Text Document.TXT) and copy the following code exactly onto it, and save the notepad.

EICAR Test code
X5O!P%@AP[4\PZX54(P^)7CC)7}$EICAR-STANDARD-ANTIVIRUS-TEST-FILE!$H+H*
 
STEP 2. Rename the file from New Text Document.TXT to myfile.com

STEP 3. Now run the antivirus scan on this myfile.com file.

If the antivirus is functioning properly on your computer, then it should generate a warning and immediately delete the file upon scanning. Otherwise you may have to re-install your antivirus.

NOTE: Most antivirus will pop-out a warning message in the Step-1 itself
 
You can also place the myfile.com file in a ZIP or RAR file and run a scan on it so as to ensure whether your antivirus can detect the test string in the compressed archive. Any antivirus when scanning this file will respond exactly as it will do for a genuine virus/malicious code. This test will cause no damage to your computer even though the antivirus will flag it as a malicious script. Hence it is the safest method to test the proper functioning of any antivirus.
PLEASE SUBSCRIBE US, FOR MORE UPDATES.

Saturday, 27 July 2013

PREVENT USB DRIVES FROM VIRUS ENTITY - A SIMPLE AND WORKING REGISTRY TRICK

0 comments
PROTECT-USB-FROM-VIRUS-VIA-REGISTRY-EDIT

IN this tutorial, you will find that how can you prevent the virus entity in your usb drives. This trick is very useful if you have virus in your,computer and want to copy files from a USB Drive but don’t want to transfer virus to the USB.
TO MAKE IT POSSIBLE, FOLLOW THE STEPS:-
STEP1: Open run box (by pressing win+R)
STEP2: Type REGEDIT in text box.
STEP3: Now navigate to : HKEY_LOCAL_MACHINE>SYSTEM>CurrentControlSet>Control
STEP4:  Here in right side panel, RIGHT CLICKt to create a key with,the name “StorageDevicePolicies”.
STEP5: Again right click to create new DWORD value then label it “WriteProtect”. Set its value to “1″.  Now in left side panel, select “StorageDevicePolicies” key,
STEP6: For again to enable it, set its values to “0″.
STEP7: Now close the registry editor and restart your computer,after any changes to go into effect.
NOTE: BECAME A FOLLOWER OF OUR SITE TO GET MORE LATEST UPDATES.

Wednesday, 24 July 2013

MAKE YOUR COMPUTER TALKS

0 comments
make-your-computer-talks

In this post I’m going to show you cool windows trick that will make your computer talks what you type . This would be fun to do on someone else’s computer as a joke.
1. Open Notepad
2. Paste the following code
Dim Message, Speak
Message=InputBox("Enter Text to Talk o","Speak")
Set Speak=CreateObject("sapi.spvoice")
Speak.Speak Message
make-your-computer-talks

3. Save the file, give it any name, but make sure you also type .VBS after the name. Also, for the Save as type box, choose All files instead of the default Text Documents.
make-your-computer-talks

4. Now double click the .vbs file and you should see the window as show below

make-your-computer-talks
5. Type what ever you want and click on OK . That’s it , your computer will speak what ever you typed in the default voice
If you want to make your computer repeat the words then add a loop. Here is the code :
Dim message, sapi

message=InputBox("Enter the text you want spoken","speak this")

set sapi=CreateObject("sapi.spvoice")
For i=1 to 10
sapi. Speak message

Next
It will repeat the same word a ten times.
PLEASE SUBSCRIBE US FOR LATEST UPDATES.

Friday, 19 July 2013

DISABLE USB PORTS WITHOUT ANY SOFTWARE

0 comments


DISABLE-USB-PORTS-WITHOUT-ANY-SOFTWARE

Pen drives are major cause of virus,  malwares and other suspicious threats in your system. it is possible to disable USB ports of your system, which prevent unwanted user (friends and others) to transfer data from your system.
In this article I will tell you that how to disable USB port by simple registry edit. So now let’s start.

Note:- Before going ahead take a back up of your registry.
Please follow the steps:-
Step 1:- open run and type “regedit".
DISABLE-USB-PORTS-WITHOUT-ANY-SOFTWARE
Step 2:- Navigate to the
[HKEY_LOCAL_MACHINE\SYSTEM\CurrentControlSet\Services\USBSTOR]
DISABLE-USB-PORTS-WITHOUT-ANY-SOFTWARE
Step 3:- Now create a dword file by right click on USBSTOR
DISABLE-USB-PORTS-WITHOUT-ANY-SOFTWARE
Step 4:- Rename it as "start" (dont create it if it is already exist).
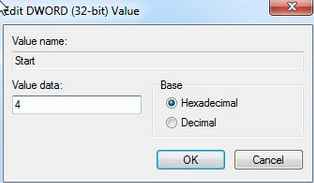
Step 5:- Now open it,and set the value "4" in the value data box.
DISABLE-USB-PORTS-WITHOUT-ANY-SOFTWARE
Step 6:- Now refresh the registry by pressing F5. And restart your system, and see the effect.
NOTE:- FOR ENABLING CHANGE THE VALUE DATA TO THE 3.THEN RESTART YOUR COMPUTER,AND SYSTEM WILL SHOW USB DRIVES AGAIN.
PLEASE IF YOU GOT STUCK AT ANY POINT, PLEASE LEAVE A COMMENT FOR US. AND DON'T FORGET TO SUBSCRIBE US.

HIDE YOUR PERSONAL DATA BEHIND A IMAGE

0 comments
HIDE YOUR PERSONAL DATA BEHIND A IMAGE
IN THAT POST I WILL TELL YOU THAT HOW CAN YOU HIDE YOUR DATA FROM OTHERS IN YOUR COMPUTER. Really it is a fantastic trick. In your computer, there are many important files or documents you want to hide from your friends and others. In this trick you will found that how can you hide your personal data behind the images. When anyone open it, then he will see only image.
So now lets start, to hide your data behind a image, please follow the steps:-
STEP1:- firstly download WINRAR from here :-WINRAR, and install it.
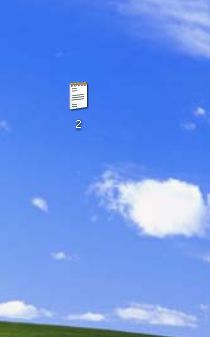
STEP2: copy a particular image(say 1.jpg) to be used for hiding data behind it. on desktop
HIDE-YOUR-PERSONAL-DATA-BEHIND-A-IMAGE

STEP3:-now select your personal file(say 2.txt) to hide behind that image.
HIDE-YOUR-PERSONAL-DATA-BEHIND-A-IMAGE 
Archive it with WINRAR, by right click on it.(make it in .rar format).And paste it on desktop(say 2.rar).

HIDE-YOUR-PERSONAL-DATA-BEHIND-A-IMAGE
STEP4:-now open the command line by typing cmd in run box. Or (start>accessories>command prompt).
HIDE-YOUR-PERSONAL-DATA-BEHIND-A-IMAGE

STEP5:-type the following command in command line:-
cd desktop

HIDE-YOUR-PERSONAL-DATA-BEHIND-A-IMAGE

NOTE: CD is used for change the directory.
STEP6:- now type the highlighted command in command line(note: put spaces at right places):-
Copy /b imagename.jpg + filename.rar finalimage.jpg

IN THE ABOVE COMMAND CHANGE:-
imagename.jpg by image name you want to hide the document behind the image.
Filename.rar by your personal document name(say 2.rar).
Finalimage.jpg by your final image. This is the image(SAY 3.jpg) where your document will be hidden.
EXAMPLE:-
Copy /b 1.jpg + 2.rar 3.jpg

AND PRESS ENTER. NOW A NEW FILE WILL BE GENERATED ON DESKTOP.(SAY 3.JPG)
HIDE-YOUR-PERSONAL-DATA-BEHIND-A-IMAGE
NOTE:THE TASK IS TOTALLY COMPLETED.NOW WHEN YOU OPEN THE FINAL IMAGE(3.jpg) IT WILL OPEN AS NORMAL IMAGE.
FOR OPEN YOUR HIDDEN FILES BEHIND THAT IMAGE, FOLLOW THE STEPS:-
STEP1:-open WINRAR, and click on file>open.
HIDE-YOUR-PERSONAL-DATA-BEHIND-A-IMAGE

STEP2:-here open your final image (say 3.jpg).OR YOU CAN DRAG IT DIRECTLY TO THE WINRAR. And it will display your personal document.
HIDE-YOUR-PERSONAL-DATA-BEHIND-A-IMAGE

NOW YOU CAN HIDE YOUR PERSONAL DATA LIKE VIDEOS, TEXT FILES BEHIND ANY IMAGE BY THAT SIMPLE TWEAK.
IF YOU HAVE ANY PROBLEM REGARDING THAT POST, PLEASE LEAVE A COMMENT FOR US. AND PLEASE DONT FORGET TO SHARE THAT POST WITH YOUR FRIENDS.


LOCK ANY FOLDER WITHOUT SOFTWARE

0 comments
LOCK-FOLDER-WITHOUT-SOFTWARE
HI FRIENDS, IN THAT POST I AM SHARING A TRICK IN WHICH YOU CAN LOCK FOLDER WITHOUT ANY SOFTWARE. In that folder you can put your personal files and documents. That folder become a password protected folder without any software. This trick will work on all windows system like(XP/7/8). To lock a folder follow the steps:-
STEP1:- Open notepad(start> accessories> notepad), paste the following highlighted code in it.
cls
@ECHO OFF
title www.cyber-sol.blogspot.in
if EXIST "Control Panel.{21EC2020-3AEA-1069-A2DD-08002B30309D}" goto UNLOCK
if NOT EXIST MyFolder goto MDMyFolder
:CONFIRM
echo want to lock the folder? (Y/N)
set/p "cho=>"
if %cho%==Y goto LOCK
if %cho%==y goto LOCK
if %cho%==n goto END
if %cho%==N goto END
echo Invalid choice.
goto CONFIRM
:LOCK
ren MyFolder "Control Panel.{21EC2020-3AEA-1069-A2DD-08002B30309D}"
attrib +h +s "Control Panel.{21EC2020-3AEA-1069-A2DD-08002B30309D}"
echo Folder locked
goto End
:UNLOCK
echo Enter password to Unlock your folder
set/p "pass=>"
if NOT %pass%== cybersolution goto FAIL
attrib -h -s "Control Panel.{21EC2020-3AEA-1069-A2DD-08002B30309D}"
ren "Control Panel.{21EC2020-3AEA-1069-A2DD-08002B30309D}" MyFolder
echo Folder Unlocked successfully
goto End
:FAIL
echo Invalid password
goto end
:MDMyFolder
md MyFolder
echo MyFolder created successfully
goto End
:End

LOCK-FOLDER-WITHOUT-SOFTWARE


STEP2:- Now save it as abc.bat.
STEP3:- Now double click on abc.bat. Then a new folder will be created with name myfolder.
LOCK-FOLDER-WITHOUT-SOFTWARE

STEP4:- Now open abc.bat then press y and press enter.
STEP5:- Now myfolder will be hidden from desktop, to access that double click on it.
STEP6:- it will ask for password, enter your default password(cybersolution). You can change it in above code.
STEP7:- Now my folder will be hidden from desktop.
NOTE:- NOW YOU CAN PUT YOUR PERSONAL FILES IN MYFOLDER. FOR THE SECURITY PURPOSES KEEP ABC.BAT IN YOUR PEN DRIVE OR AT SECURE PLACE.

IF YOU HAVE STUCK AT ANY STEP, PLEASE LEAVE A COMMENT BELOW THE POST.

MAKES YOUR KEYBOARD LEDS TO DANCE

0 comments
makes-keyboard-led-blink

HI friends,Today I will be telling you a fantastic trick which will makes your keyboard LEDS to dance. It is also a good prank for your friends.
you may also like:-
 In this trick we have to create a simple visual basic script to make three LEDS example: CAPS LOCK, SCROLL LOCK, NUM LOCK dance. It is a very simple task.
To make the LEDS blinking follow the steps:-
step1: Open notepad and paste the following code in it.
 Set wshShell =wscript.CreateObject("WScript.Shell")  
 do  
 wscript.sleep 100  
 wshshell.sendkeys "{CAPSLOCK}"  
 wshshell.sendkeys "{NUMLOCK}"  
 wshshell.sendkeys "{SCROLLLOCK}"  
 loop  


MAKE-KEYBOARD-LEDS-TO-DANCE

step 2: Then save it as abc.vbs (vbs is stands for visual basic script)
MAKE-KEYBOARD-LEDS-TO-DANCE

step 3: Now open the save file and see the magic. Yes, your keyboard LEDS blinking like Christmas, Diwali lights
NOW, HOW TO STOP THE BLINKING LIGHT:-
FOR THAT,FOLLOW THE STEPS:-
step 1: Open task manager by pressing (ctr l + alt + Del)
step 2: Navigate to process tab.
MAKE-KEYBOARD-LEDS-TO-DANCE

Step 3: search for wscript.exe and select it.
MAKE-KEYBOARD-LEDS-TO-DANCE

step 4: click on end process.
YOU CAN DIRECT DOWNLOAD THE VB SCRIPT FILE FROM :
DOWNLOAD HERE
NOTE: IF YOU GOT STUCK ANY POINT, PLEASE LEAVE A COMMENT BELOW THE POST.
AND SUBSCRIBE US, FOR MORE UPDATES.

HOW TO MAKE A NAMELESS AND IMAGELESS FOLDER

0 comments
MAKE-A-NAME-LESS-AND-IMAGE-LESS-FOLDER

HI FRIENDS, In that post I am sharing a trick about “HOW TO MAKE A NAMELESS AND IMAGE-LESS FOLDER”. It is a simple tweak for your friends. This trick will allow you to make folder without any name and image. This trick is applicable for all windows systems.
SO, NOW LETS START, TO MAKE A NAMELESS AND IMAGE LESS FOLDER, FOLLOW THE STEPS:-
Step1:- Make a new folder on desktop or on other places.
MAKE-A-NAME-LESS-AND-IMAGE-LESS-FOLDER

Step2:- Right click on it and select rename.
MAKE-A-NAME-LESS-AND-IMAGE-LESS-FOLDER

Step3:-Erase the text in text box, and now keep pressing alt key and type 255, and then release the alt button.
MAKE-A-NAME-LESS-AND-IMAGE-LESS-FOLDER

NOTE:- LAPTOP USERS NEED TO ENABLE   NUM LOCK.
Step4:- For removing the folder image, right click on folder and select properties.
MAKE-A-NAME-LESS-AND-IMAGE-LESS-FOLDER

Step5:- IN customize tab select the change icon menu. A new window will open. Now there search for a blank image. And select it.
MAKE-A-NAME-LESS-AND-IMAGE-LESS-FOLDER


Step6:- Press OK.
DONE! YOU HAVE CREATED A FOLDER..

IF YOU HAVE ANY PROBLEM REGARDING THIS POST THEN PLEASE LEAVE A COMMENT BELOW THE POST.

Thursday, 4 July 2013

USE ANY BROWSER AS NOTEPAD

0 comments
USE ANY BROWSER AS NOTEPAD
USE-ANY-BROWSER-AS-NOTEPAD

Friends,In this post you will find that how can we use any browser as a notepad or “writer”.
Many times,I need to note some important data such as keys,codes etc. then I open a notepad to note it.
And I think you also do it for many purposes. But in that post I am share a solution of that problem in which you will learnt that  “how to use any browser as notepad”. Really it is not a joke ,you can do it simply by following some steps. For this you have to create a bookmark.To make it possible follow the following steps:-
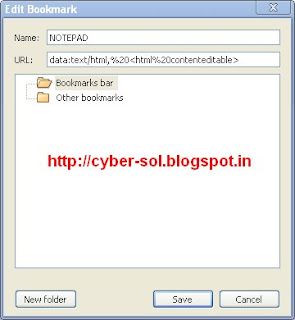
STEP 1.) Firstly open your browser(let say Google chrome),and create a new bookmark.
USE-ANY-BROWSER-AS-NOTEPAD

STEP 2.) Give it a name (example NOTEPAD)
STEP 3.) In the address bar(bookmar) type the following scipt.
data:text/html,%20<html%20contenteditable>
USE-ANY-BROWSER-AS-NOTEPAD

STEP 4.)click on save.
USE-ANY-BROWSER-AS-NOTEPAD

Now the work is totally completed,when you have to note some notes from any website,then click on “notepad” bookmark. It will open a new tab, and you can write anything here.
If have any problem,leave a comment below. AND SUBSCRIBE US FOR LATEST UPDATES.

Thursday, 27 June 2013

BOOST YOUR START MENU DISPLAY SPEED

0 comments
BOOST-YOUR-START-MENU-DISPLAY-SPEED

INCREASE START MENU DISPLAY SPEED
In this tutorial you will learn that how to increase start menu display speed.
Many times, when we click on start menu then there is some delay to display the programs,but it has no reason. That speed can be maintained by a simple registery edit.
Note: before going ahead please take a back up of your registry
To increase the speed of menu display speed, follow the steps:-
Step 1:- go to start>run.
Step 2:- in the box, type “regedit”. A new window will opened.
BOOST-YOUR-START-MENU-DISPLAY-SPEED

Step 3:-then navigate to:-
HKEY_CURRENT_USER\Control Panel\Desktop
BOOST-YOUR-START-MENU-DISPLAY-SPEED

Step 4:- in the right pane find “Menu show delay”.
BOOST-YOUR-START-MENU-DISPLAY-SPEED

Step 5:- open it, and set the default value to the “000”
BOOST-YOUR-START-MENU-DISPLAY-SPEED
IF YOU HAVE ANY PROBLEM, THEN PLEASE CLICK ON THAT VIDEO.


NOTE:- IF YOU GOT LOST AT ANY POINT, PLEASE LEAVE A COMMENT FOR US. AND DON'T FORGET TO SUBSCRIBE US.


Wednesday, 26 June 2013

10 TIPS THAT MAKES YOUR SYSTEM FASTER

0 comments
10-TIPS-THAT-MAKES-YOUR-SYSTEM-FASTER

Have you noticed that many times, your system runs slower than before?
In this article, I hope to compile a list of 10 tips that can be used to get rid from slow pc.
By following these tips you can maintain your system, increase its processing speed, and running smoothly.
10 TIPS THAT MAKES YOUR SYSTEM FASTER
1. You can refresh the system by pressing F5 after the closing of any application, due to which unused files are removed from the RAM.
2. Do not place a lot of shortcuts on desktop. Each shortcut on desktop consumes 500-600 bytes of RAM.

10-TIPS-THAT-MAKES-YOUR-SYSTEM-FASTER

3. Do not set the large size image as your desktop background wallpaper.
4. Do not execute any application before the system completely boots.
5. Empty the recycle bin regularly. You can use ccleaner software for it. The files are not permanently deleted from your hard drive until you remove the files from recycle bin.

10-TIPS-THAT-MAKES-YOUR-SYSTEM-FASTER
6. delete the temp files regularly(by typing the “%temp%” in run box)

10-TIPS-THAT-MAKES-YOUR-SYSTEM-FASTER
7. do not forget to defragment your hard drive once in 15-20 days. This will save a lot of space on your hard drive and rearrange the files, so that applications run smoothly.

10-TIPS-THAT-MAKES-YOUR-SYSTEM-FASTER
8. make maximum 2-3 drive in your system. Install large software like (Microsoft visual studio, matlab , orcad etc) in the second partition. Windows uses the entire free space as virtual memory. When your system’s RAM is full, keep the c drive as free as possible.

10-TIPS-THAT-MAKES-YOUR-SYSTEM-FASTER

9. when you are installing a new program, then do not enable a option of “having a tray icon”. Because the tray icon use the available RAM. And slow down the booting speed of system. Also do not enable the option “start automatically on start up”.
10.protect your pc from dust and moisture. Because dust causes the cpu fan to jam and to generate a noise, and decrease s it’s life.
 

ABOUT THE AUTHOR

Founder & Author:I ABHISHEK BHATI student of COMPUTER SCIENCE by education a Blogger by profession. Exploring Technology is my passion.BHATI TRICKS is place for Tech Lovers. ABHISHEK BHATI launched his frist Marketing Site in 2013.
...Read More

GET FREE EMAIL UPDATES

Join us for free and get valuable content delivered right in your inbox.


recent comments

BHATI TRICKS Widget

| BHATI TRICKS © BHATI TRICKS. All Rights Reserved | | Back To Top |